10 kinds of meat and how long to store them each in the freezer.
Home Tips 21/08/2025 01:16
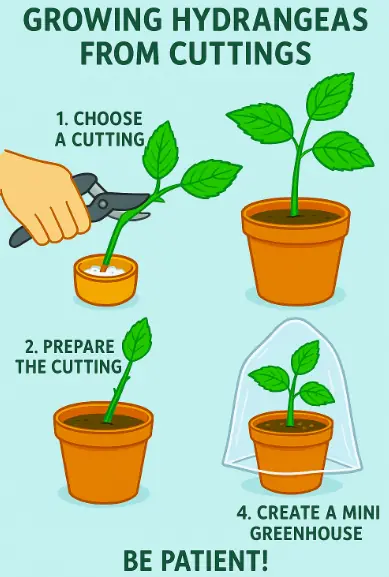
Growing hydrangeas from cuttings is not only a cost-effective way to expand your garden, but also an incredibly satisfying process for gardeners of all experience levels. With just a few simple steps, you can propagate beautiful new hydrangea plants right at home.
Choose a healthy, non-flowering stem from your hydrangea plant. Look for new growth that is green and flexible, not woody. The cutting should be about 5–6 inches (12–15 cm) long and have two pairs of leaves.
Using clean, sharp scissors or pruning shears, cut the stem at a 45-degree angle just below a leaf node.
Remove the lower leaves, leaving only the top two leaves intact. You can also trim the top leaves in half to reduce moisture loss.
Optional: Dip the cut end into rooting hormone powder or gel to encourage faster root development.
Fill a small pot with well-draining potting mix, ideally mixed with perlite or vermiculite to promote aeration and moisture balance.
Make a hole in the center of the soil with a pencil or stick.
Insert the cutting gently into the hole, about 2 inches deep.
Press the soil around the stem to hold it firmly in place.
To simulate a greenhouse:
Cover the entire pot with a clear plastic bag or dome. Use sticks or skewers to keep the plastic from touching the leaves.
This helps maintain high humidity, which is essential for root formation.
Place the pot in bright, indirect sunlight (avoid harsh, direct rays).
Keep the soil consistently moist but not soggy. Water gently if the top layer feels dry.
Watch for condensation inside the plastic—this means humidity is sufficient. If there's too much, open the cover briefly for ventilation.
After 2–4 weeks, gently tug on the cutting. If you feel resistance, it means roots have started to grow.
If there's no resistance after 4 weeks, don’t worry—some cuttings take longer, or may need to be restarted.
Once the roots are strong and visible (you may see them through drainage holes), transplant the cutting into:
A larger pot, or
Directly into your garden (ideally in spring or early fall).
Choose a spot with morning sun and afternoon shade, and water the plant thoroughly after transplanting.
Not every cutting will succeed—but with consistent care, patience, and a little love, you’ll soon be rewarded with vibrant hydrangea blooms in your garden.